
今回はNew RelicでWebhookを使ってアラート通知する方法を紹介していきます。
Webhook通知にSlack Incoming Webhookを利用し、Slackチャンネルへ通知していきます。
Slack設定に必要な権限等は適宜用意しておいてください。
Slack Incoming Webhookの設定
New RelicではSlack アプリケーションとして、「New Relic application」が標準で提供されていますが、今回紹介するWebhookを利用することで、Slack通知メッセージがカスタマイズ可能になります。
Webhook利用の事前準備として、下記を参考にSlack Incoming Webhooksを設定します。
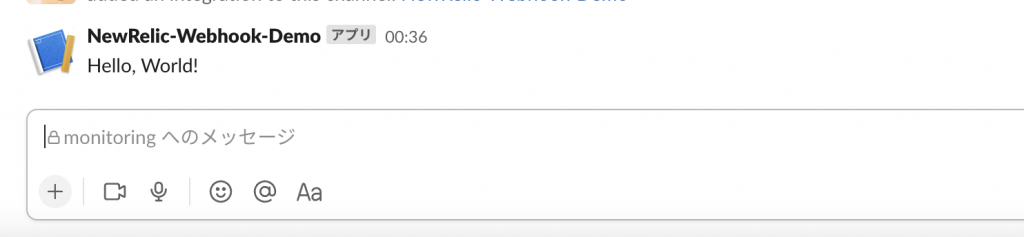
設定後、Webhook URLをアクティブにし通知対象チャンネルへサンプルのcurlリクエストを送信すると下記のように表示されるはずです。
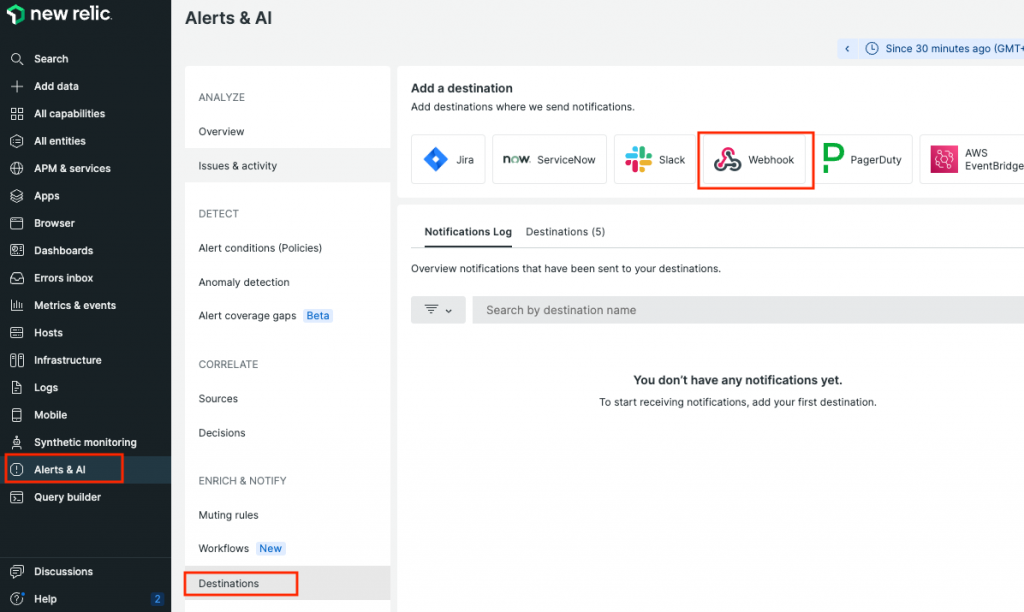
New Relic Destinationの作成
次にNew RelicのDestinationにSlack上にて設定したWebhookを追加していきます。
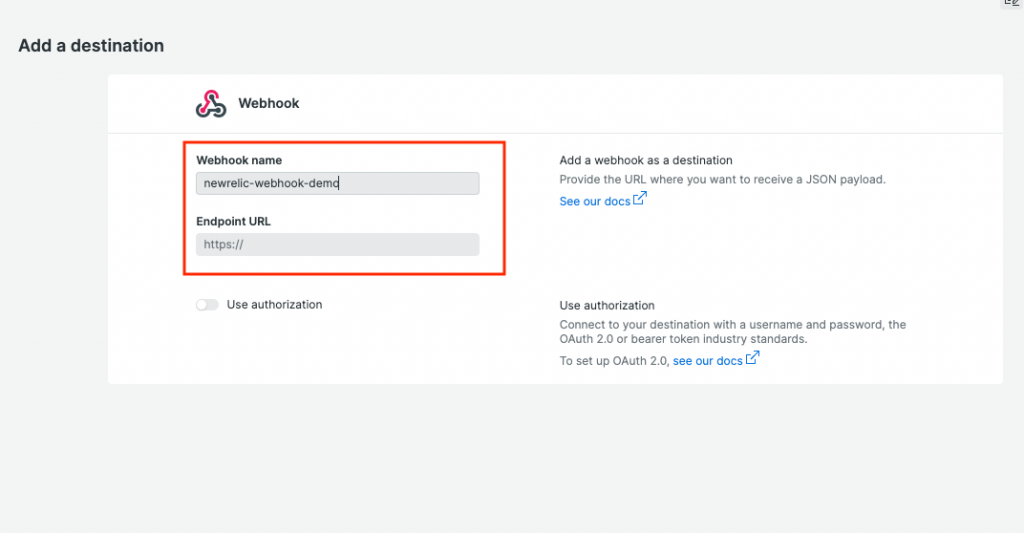
New Relicの[Alerts & AI]、[Destinations]より[Webhook]をクリックします。
[Webhook name]を適宜入力し、[Endpoint URL]にSlack Webhook URLを設定します。
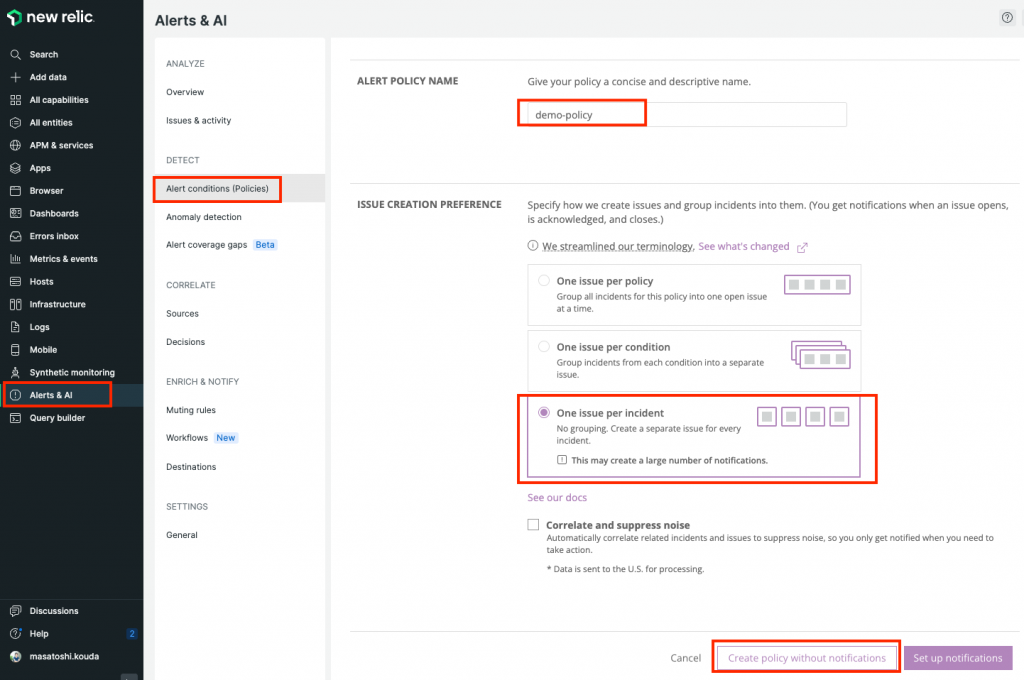
New Relic Alert Policyの作成
次にAlert Policyを作成していきます。
[Alerts & AI]、[Alert conditions (Policies)]より[New alert policy]をクリックします。
[ALERT POLICY NAME]と[ISSUE CREATION PREFERENCE]を適宜設定し、[Create policy without notifications]をクリックし作成します。
New Relic Alert conditionsの作成
作成したAlert PolicyにAlert conditionsを作成していきます。
[Creaet a condition]よりアラート作成していきます。
ここでは例として、NRQL Queryを利用しAWS API Gwatewayを対象にしたアラートを作成しています。
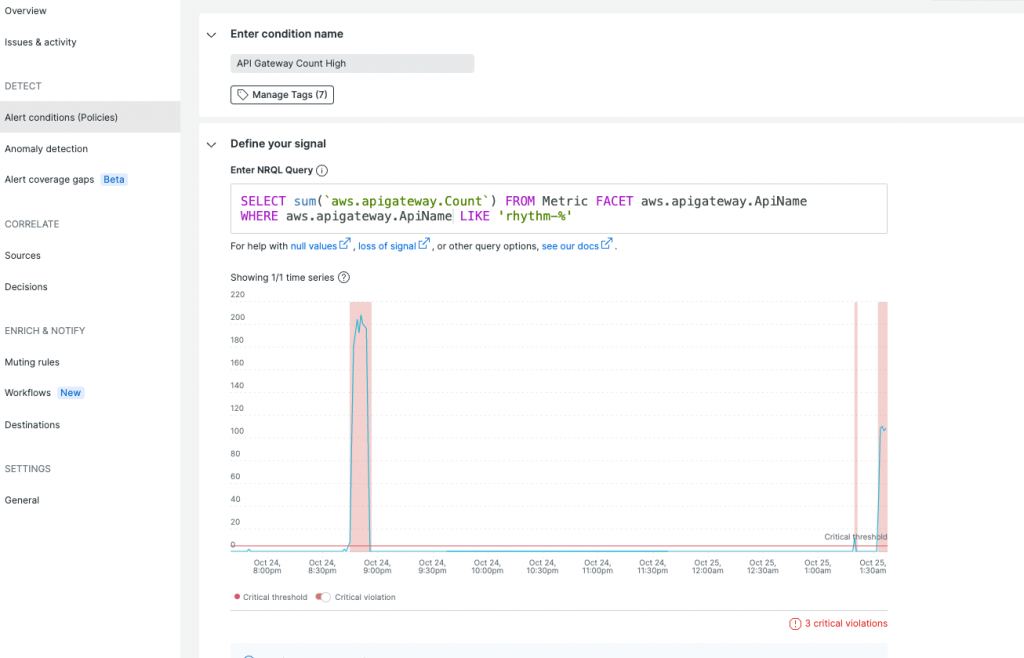
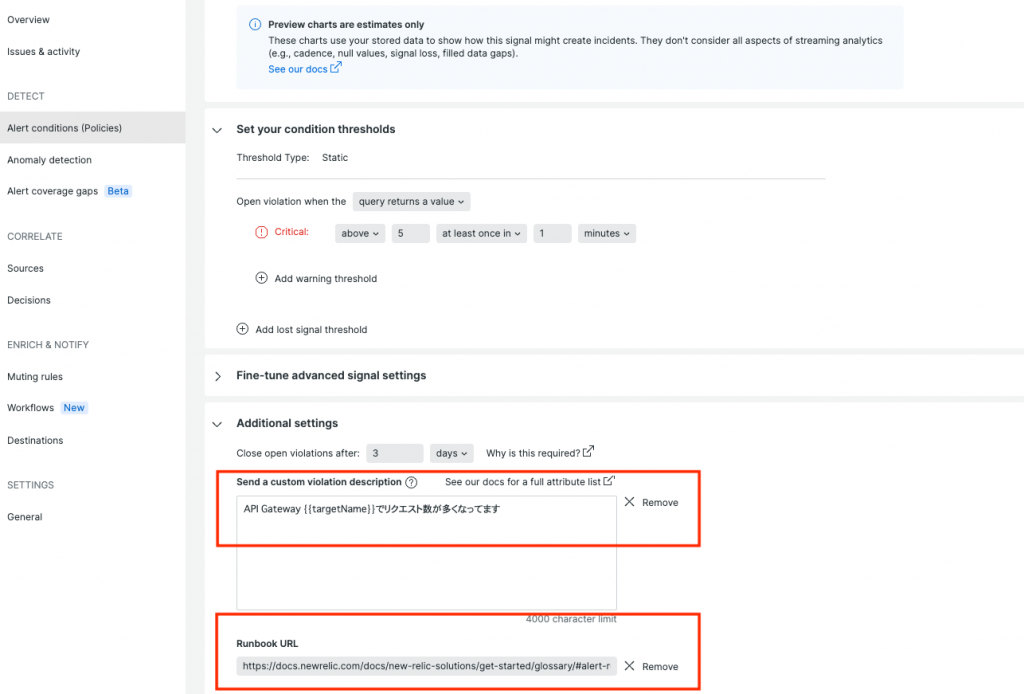
しきい値を適宜設定し、Webhookで通知するメッセージに利用できるように、[description]、[Runbbok URL]を入力していきます。
[description]には{{targetName}}といった属性情報を埋め込むことが可能です。利用できる属性情報は下記を参考にしてみてください。
[Runbbok URL]には、障害対応手順として参照するドキュメントのURLが設定可能です。
問題なければ[Save condition]をクリックし設定内容を保存します。
New Relic Workflowsの作成
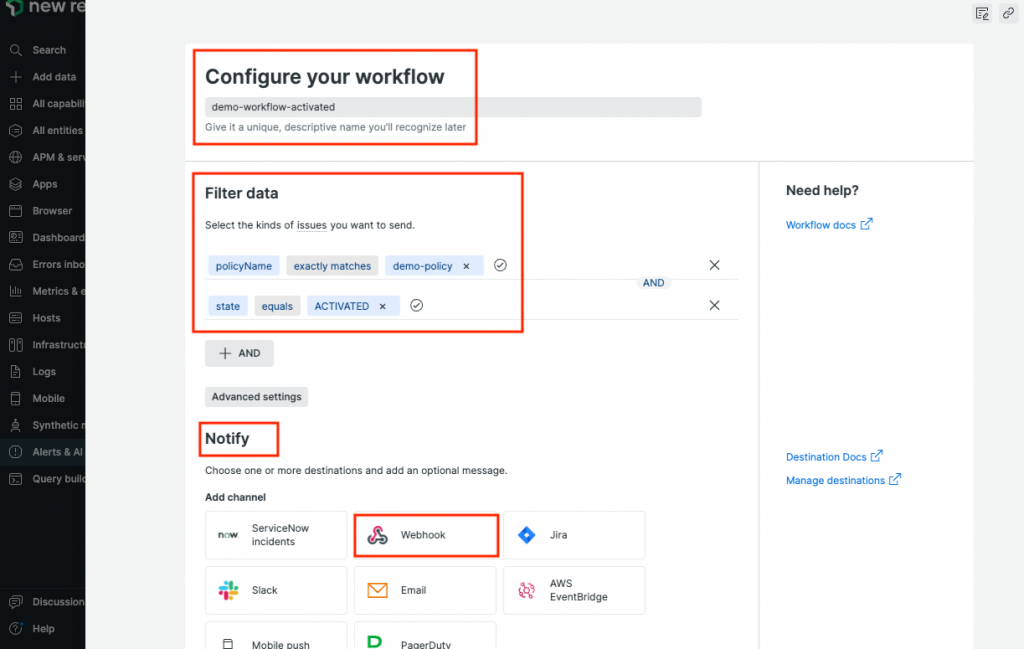
次にWorkflowsを作成していきます。
[Alerts & AI]、[Workflows]より[Add a workflow]をクリックします。
Workflowの名前を適宜入力し、[Filter data]より通知対象となるissueのフィルタ条件を入力します。
ここでは例として、[policyName]、[exactly matches]より作成したポリシーを指定します。
追加の条件として[state]、[equals]より[ACTIVATED]を指定します。
New Relic Webhookの作成
次にアラート通知先として[Notify]より[Webhook]を選択します。
チャンネル名を適宜入力し登録した[Destination]を選択します。
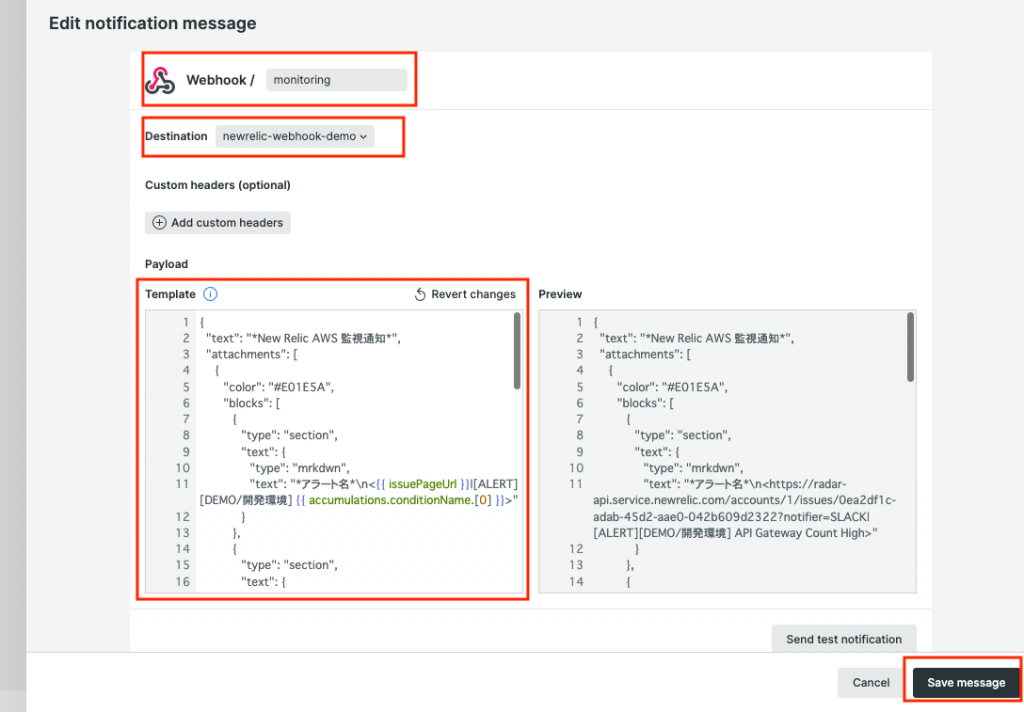
通知に利用するPayloadはカスタマイズ可能です。ここでは例として下記の内容を入力します。
注意) Slackへテスト通知させる場合、下記JSONのimage_urlに指定されている{{violationChartUrl}}が存在しないためエラーになるはずです。
テスト通知させる時は一時的に下記のようなURLに変更して確認してみてください。
https://api.slack.com/img/blocks/bkb_template_images/onboardingComplex.jpg{
"text": "*New Relic AWS 監視通知*",
"attachments": [
{
"color": "#E01E5A",
"blocks": [
{
"type": "section",
"text": {
"type": "mrkdwn",
"text": "*アラート名*\n<{{ issuePageUrl }}|[ALERT][DEMO/開発環境] {{ accumulations.conditionName.[0] }}>"
}
},
{
"type": "section",
"text": {
"type": "mrkdwn",
"text": "*概要*\n{{ accumulations.conditionDescription.[0] }}"
}
},
{
"type": "image",
"title": {
"type": "plain_text",
"text": "image1",
"emoji": true
},
"image_url": "{{ violationChartUrl }}",
"alt_text": "image1"
},
{
"type": "section",
"text": {
"type": "mrkdwn",
"text": "*ステータス*\n障害発生中"
}
},
{
"type": "section",
"text": {
"type": "mrkdwn",
"text": "*対応手順書*\n<{{accumulations.runbookUrl.[0]}}| {{ accumulations.conditionName.[0] }} 障害対応手順書>"
}
},
{
"type": "section",
"text": {
"type": "mrkdwn",
"text": "*New Relic Issue Name*\n{{ annotations.title.[0] }}"
}
}
]
}
]
}Webhook アラート通知の確認
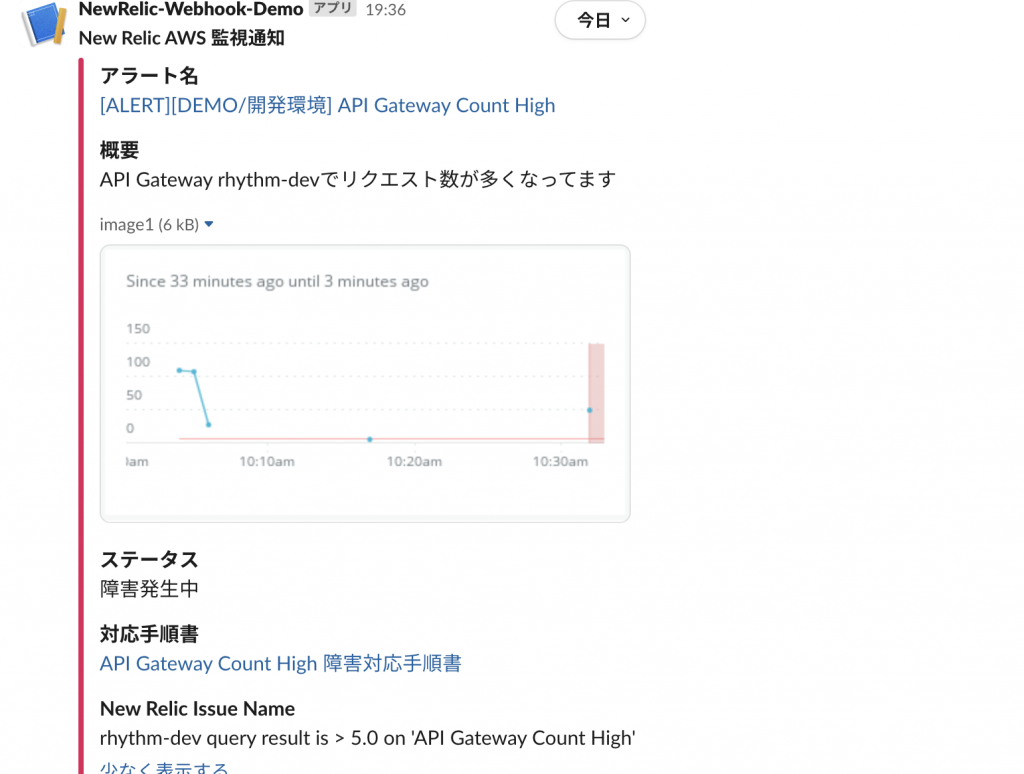
Webhookによるアラート通知確認の為、Alert conditionsで設定したしきい値を擬似的に超過させ、アラート通知を確認します。
アラート通知として、下記のようなメッセージがSlackへ通知されれば成功です。
アラート回復した際も通知したい場合、同様にWorkflowsを作成します。
[Filter data]より[policyName]、[exactly matches]より作成したポリシーを指定します。
追加の条件として[state]、[equals]より[CLOSED]を指定します。
Webhookに利用するPayloadは下記のようなJSONを入力します。
{
"text": "*New Relic AWS 監視通知*",
"attachments": [
{
"color": "#2eb886",
"blocks": [
{
"type": "section",
"text": {
"type": "mrkdwn",
"text": "*アラート名*\n<{{ issuePageUrl }}|[RESOLVED][DEMO/開発環境] {{ accumulations.conditionName.[0] }}>"
}
},
{
"type": "section",
"text": {
"type": "mrkdwn",
"text": "*概要*\n{{ accumulations.conditionDescription.[0] }}"
}
},
{
"type": "image",
"title": {
"type": "plain_text",
"text": "image1",
"emoji": true
},
"image_url": "{{ violationChartUrl }}",
"alt_text": "image1"
},
{
"type": "section",
"text": {
"type": "mrkdwn",
"text": "*ステータス*\n障害復旧済み"
}
},
{
"type": "section",
"text": {
"type": "mrkdwn",
"text": "*対応手順書*\n<{{accumulations.runbookUrl.[0]}}| {{ accumulations.conditionName.[0] }} 障害対応手順書>"
}
},
{
"type": "section",
"text": {
"type": "mrkdwn",
"text": "*New Relic Issue Name*\n{{ annotations.title.[0] }}"
}
}
]
}
]
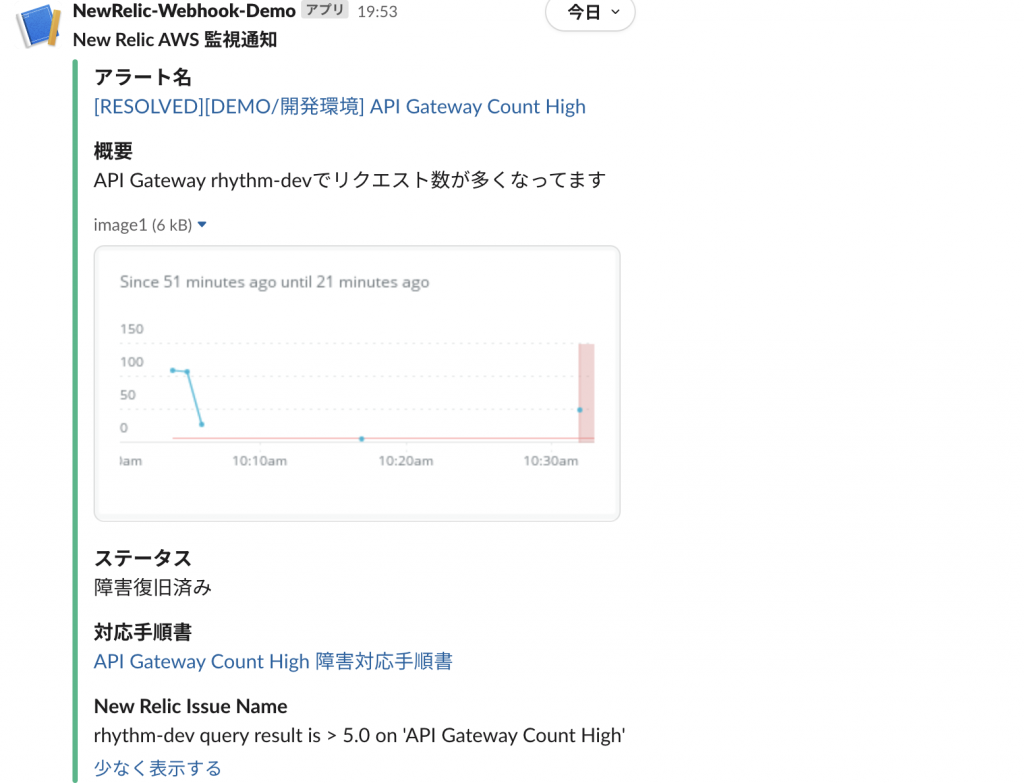
}アラート回復時に下記のような内容がSlackへ通知されれば成功です。
さいごに
New RelicでWebhookを使ってアラート通知する方法いかがでしたでしょうか。
Webhookを利用することでアラート通知メッセージがカスタマイズ可能な為、初動対応の効率化に繋がるのではないでしょうか。
最後までご覧いただきありがとうございます。