こんにちは、香田です。
GCPのサービスを利用して、リアルタイムにデータ変換処理のパイプラインを実現する場合、Cloud Dataflowを利用することが多いのではないでしょうか。
例えば、DataflowでPubSubからメッセージを読み込み、BigQueryにロードするといった処理がテンプレートとしても用意されているので、要件にマッチしていれば簡単に導入できるので非常に有用ではないでしょうか。
データパイプラインのサービスに関連して、GCPではGUIで簡単に作成できるCloud Data Fusionも提供されています。
Cloud Data Fusionではパイプラインとしてバッチ パイプラインとリアルタイム パイプラインを提供しています。
今回はリアルタイム パイプラインの作成を紹介していきます。
はじめに
Cloud Data Fusionでリアルタイム パイプラインを利用するには、Enterprise エディションを利用する必要があります。
Enterprise エディションは1時間($4.20)程費用が発生する為、パイプラインを開発する時はローカル環境でCDAP Sandboxを利用したほうがコストを節約できるのでオススメです。
CDAP Sandboxについては下記の記事を参考にしてみてください。
CDAPのパイプラインをローカルで作成し、Cloud Data Fusionで実行する
作業の流れとしては、パイプラインの開発はCDAP Sandboxで開発&検証し、最後にCloud Data Fusionにデプロイする流れとなります。
今回、PubSubから受信するデータは下記のようなメッセージを想定して、パイプラインの変換処理を進めています。
$ gcloud pubsub subscriptions pull --auto-ack my-sub
┌───────────────────┬──────────────────┬──────────────┐
│        DATA       │    MESSAGE_ID    │  ATTRIBUTES  │
├───────────────────┼──────────────────┼──────────────┤
│ No.1 test message │ 1125074670101625 │ region=tokyo │
└───────────────────┴──────────────────┴──────────────┘
Studioでリアルタイムのパイプラインを選択
CDAP UIへアクセスし[Integrate]の[Studio]をクリックします。

[Data Pipeline – Realtime]に変更します。

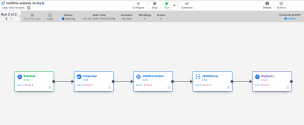
Source PubSub 設定
[Source]より[PubSub]を選択し[Properties]をクリックします。

[Reference Name]、[Project ID]、[Subscription]、[Topic]、[Service Account File Path]
を入力します。

Transform Projection 設定
PubSubのmessageはbyte型になっている為、TransformのProjectionを利用し、string型に変換します。
[Transform]より[Projection]を選択し[Properties]をクリックます。

[Projection Configuration]の[Convert]に[message]と入力し、[string]を選択し[Validate]よりチェックします。

Transform JSONFormatter 設定
PubSubのattributes Fieldはmap型になっている為、TransformのJSONFormatterを利用し、レコードを一度JSONオブジェクトにフォーマットします。
[Transform]より[JSONFormatter]を選択し[Properties]をクリックます。

[Output Schema]は単一フィールドのみとなる為、[Name]に[data]と入力し、[Type]は[string]に変更し[Validate]よりチェックします。

Transform JSONParser 設定
Transform JSONParserを利用し、JSONオブジェクトをレコードにパースしていきます。
JSONFormatterで処理する前のレコードと異なる点は、JSONParserによってattributesのKeyを取り出しfieldに変換しているところです。
[Transform]より[JSONParser]を選択し[Properties]をクリックます。

[JSON Parser]の[Input Field]に[data]と入力します。
[Json Path Mappings]、[OutPut Schema]は下記のように設定し[Validate]よりチェックします。

Sink BigQuery 設定
[Sink]より[BigQuery]を選択し[Properties]をクリックします。

[Reference Name]、[Project ID]、[Dataset]、[Table]、[Temporary Bucket Name]、[Service Account File Path]を入力します。

CDAP Sandboxでリアルタイムパイプラインの実行
パイプラインの名前を入力し、[Save]し[Deploy]をクリックします。

[Run]をクリックし、[Status]が[Running]になっていることを確認します。

PubSubへテストメッセージの送信
pubsubへテストメッセージを送信します。
for i in `seq 1 50`
do
    gcloud pubsub topics publish my-topic --message "No.$i test message" --attribute "region=tokyo"
    sleep 1
done
Sinkで設定したBigQueryのテーブルにクエリし、下記のような結果が確認できれば成功です。

パイプライン設定のエクスポート
[Actions]より[Export]してパイプライン設定をエクスポートします。

Cloud Data Fusionにインポート
Enterprise エディションでCloud Data Fusionを起動し、パイプライン設定をインポートします。
Source PubSubとSink BigQueryの[Properties]をクリックし、[Project ID]、[Service Account File Path]を[auto-detect]に変更しておきます。

Cloud Data Fusionでリアルタイムパイプラインの実行
[Deploy]後に[Run]をクリックし[Status]が[Running]になっていることを確認します。

下記の用にDataproc ClusterがMaster 1台、Worker 2台起動していることが確認できます。

CDAP Sandoxで検証した時と同様に、PubSubへテストメッセージを送信しBigQueryで同じような結果が確認できれば成功です。
さいごに
Cloud Data Fusionでリアルタイムのパイプラインを作成し実行してみましたが、如何でしたでしょうか。
変換処理も含めたデータパイプラインがGUIでノンコーティングで組み立てられるのは便利でよいですね。
補足ですが、リアルタイム パイプラインではパイプラインを削除することで、Dataproc Clusterが削除されます。
Cloud Data Fusionインスタンスを先に削除してしまうと、Dataproc Clusterは残ったままになるので注意が必要ですね。
最後までご覧頂きありがとうございます!